Setting the right fuses to enable debugging
The good news for Arduino IDE 2 users: You do not have to worry about fuses. Almost all the fuse setting details are taken care of by the IDE. You need to set the right fuses once in the beginning before debugging begins (using the Burn Bootloader IDE command). Further, on targets with JTAG interface, it may be necessary to enable the JTAG pins.
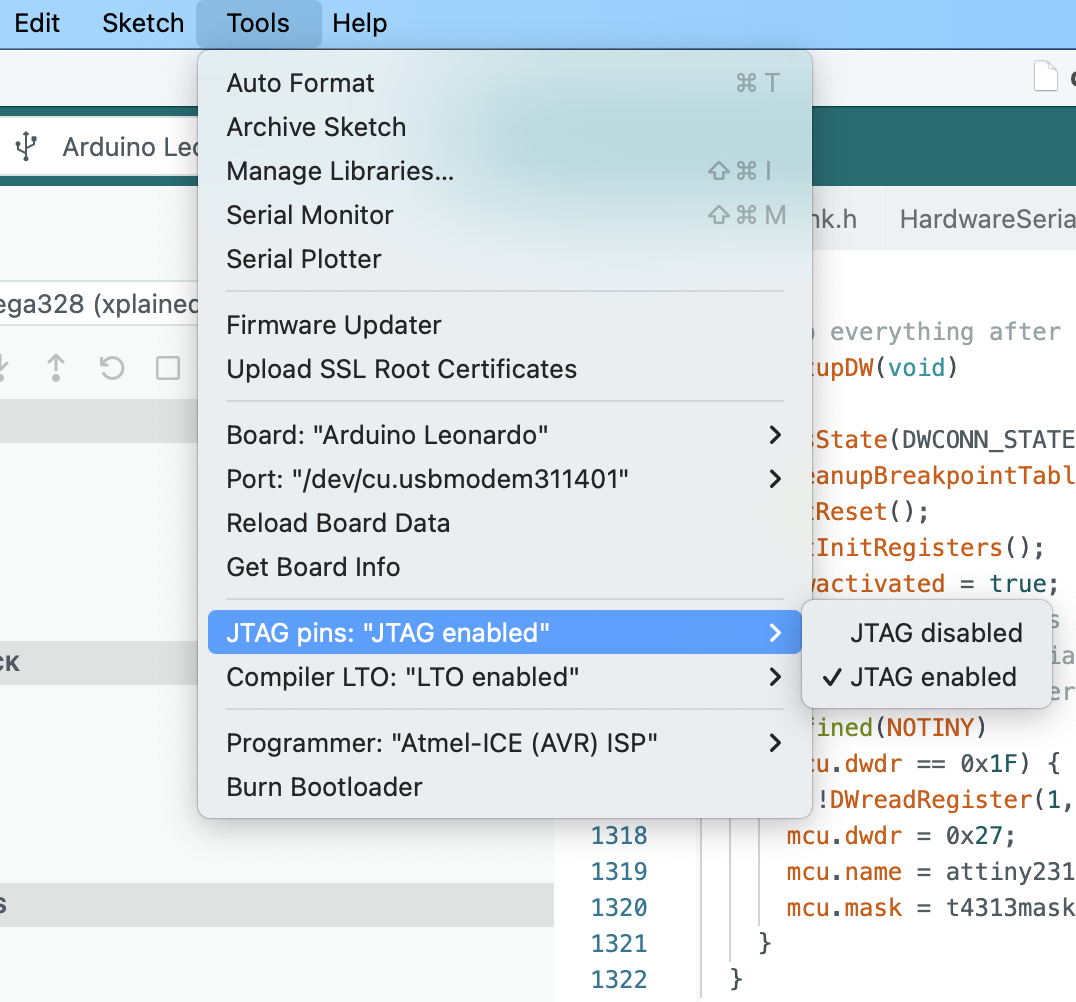
How to enable the JTAG pins
You can enable the JTAG pins by choosing JTAG pins: JTAG enabled in the Tools menu, followed by the Burn Bootloader action using an SPI programmer (because the JTAG pins are not yet active!).
Make sure that all option values are correct before using the Burn Bootloader command
When you use the Burn Bootloader command, all fuses corresponding to the specified options in the Tools menu are set. Make sure that the values are all correct before setting the fuses.
And this is all you have to know when you use the Arduino IDE 2. In general, the story is a bit more complex, however.
General considerations
Sometimes it may be necessary to change a few fuses before debugging is possible. Some of the fuses will be taken care of by the GDB server, provided PyAvrOCD is asked to manage these fuses by a command line option, e.g., --manage all, when invoking the GDB server. The --manage all option is the default for the Arduino IDE 2. However, one can instead specify individually which resources to manage:
Lockbits: If lockbits are set, then debugging is impossible. For this reason, the GDB server will clear the lockbits by erasing the chip's flash and EEPROM memory, provided PyAvrOCD has been instructed to manage the lockbits by--manage allor--manage lockbits.BOOTRST: If this fuse is programmed, then instead of starting at address 0x0000, the MCU will start execution at the bootloader address. Since this is usually not intended when debugging, the GDB server unprograms this fuse. For the unlikely case that one wants to debug a bootloader, there is still the option to protect this fuse by not includingbootrstas a fuse to be managed by the server when starting the GDB server from the command line.DWEN: This fuse needs to be programmed to access the debugWIRE on-chip debugger module. PyAvrOCD will program this fuse when asked to do so by the commandmonitor debugwire enable. After the fuse has been programmed, you must power-cycle the target board to enable the debugWIRE interface. Note that afterwards, SPI programming is impossible. With the commandmonitor debugwire disable, the debugWIRE interface will be disabled, and theDWENfuse will be unprogrammed.OCDEN: This is the fuse for enabling the JTAG on-chip debugger. It is simpler to deal with thanDWEN, because one can enable and disable this fuse in every situation. It will be activated before debugging starts and deactivated afterward.EESAVE: If this fuse is programmed, then EEPROM contents will survive chip erase operations. If not, EEPROM content is deleted each time an erase operation is performed, even if this is only organizational. If you want to protect your EEPROM content, allow PyAvrOCD to manage this fuse. It will then temporarily program this fuse when necessary in order to safeguard the EEPROM content. This is particularly important when loading an executable that contains a code part to be stored in EEPROM. However, it does not help you when you need to clear the lock bits. If any lock bits are set, it is not possible to change fuses, which means you cannot change the EESAVE fuse temporarily.
If you want to leave all the fuse management to PyAvrOCD, then specify --manage all. If you want to play it safe instead, you can manage these fuses and the lockbits manually using a fuse setting program such as avrdude.
Preparing a debugWIRE target
In almost all cases, you do not need to change any fuses on a debugWIRE target before you can start debugging. One exception is when the RESET pin has been disabled (by programming the RSTDSBL fuse), allowing it to be used as a GPIO. In this case, you need to unprogram this fuse using high-voltage programming. The same holds when SPIEN (enabling SPI programming) is unprogrammed.
Fuse settings when PyAvrOCD manages the fuse
The DWEN and BOOTRST fuses and the lockbits will be taken care of by PyAvrOCD, if this is permitted. EESAVE is not managed because the only situation where a chip erase can happen is when you clear the lockbits. And in this situation, EESAVE cannot be activated.
Fuse settings when fuses are managed manually
When you want complete control over the fuses, then make sure that the fuses are set as follows before you invoke the debugger:
-
If
lockbitsare set, clear them by erasing the entire chip. This is necessary because otherwise, debugging is impossible. This operation will erase any bootloader as well. -
Unprogram the
BOOTRSTfuse, if present and programmed. Otherwise, execution will not start at address 0x0000, but in the bootloader area that has been cleared. -
Program the
DWENfuse. After that, power-cycle the target board, which will bring the chip into debugWIRE mode.
Now, you should be able to connect to the OCD on the target MCU.
After you have finished debugging and issued the monitor debugwire disable command, you can connect again with an SPI programmer and unprogram the DWEN fuse.
Preparing a JTAG target
Access to the JTAG pins could be disabled. This is, for example, the case for the Arduino boards. In this case, you need to program the JTAGEN fuse before debugging can start. For this purpose, you need the SPI programming interface.
As in the debugWIRE case, it could be that SPI programming has been disabled. If the JTAG pins are enabled. Otherwise, high-voltage programming is necessary.
Fuse settings when PyAvrOCD manages fuses
The OCDEN, BOOTRST, and EESAVE fuses and the lockbits will be taken care of by PyAvrOCD.
Fuse settings when fuses are managed manually
When you want complete control over the fuses, make sure that the fuses are set as follows before you invoke the debugger. Make sure that the JTAG pins are enabled. Afterward, use avrdude and a JTAG programmer as follows:
- If
lockbitsare set, clear them by erasing the entire chip. This is necessary because otherwise, debugging is impossible. This will erase any bootloader as well. -
Unprogram the
BOOTRSTfuse, if programmed. Otherwise, execution will not start at address 0x0000, but in the bootloader area that has been cleared. -
Program the
OCDENfuse.
Now, you should be able to connect to the OCD on the target MCU.
After you have finished debugging, you should unprogram OCDEN because otherwise no lower-power operation is possible.
Preparing a UPDI target
If the UPDI pin is a dedicated UPDI pin, you do not have to prepare anything. However, if it is a pin with UPDI/GPIO/RESET shared functionality, and the UPDI functionality has been disabled, you need high-voltage programming. PyAvrOCD does not support this because the compatible debug probes do not support high-voltage programming. The advice is to buy a dedicated high-voltage UPDI programmer or build one on a breadboard, and then restore the UPDI functionality.
Fuse settings when PyAvrOCD manages the fuse
UPDI targets do not have a special debugging fuse, and the bootloader, if there is one, will be overwritten with NOPs. This means you only need to care about lockbits. So, for UPDI targets, PyAvrOCD will only manage the EESAVE fuse and the lockbits for you.
Fuse settings when fuses are managed manually
When you want complete control over the fuses, you only have to make sure that the lockbits are cleared. You may also want to set the EESAVE fuse.